
SEO is short for “search engine optimization.” It refers to the process of creating and formatting content with the greatest probability of ranking highly on search engines. Search engines employ complex algorithms consisting of hundreds of factors that determine the order in which pages show up on SERPs (search engine results pages) whenever a user searches for particular keywords or phrases. The stakes of this process are quite high, both for producers and consumers of content. On the producer side, search engines are free marketing. Traffic = profit and influence for businesses and creators. On the consumer side, the better the quality of search results, the more efficiently consumers can access the content they are after.
Some websites rely exclusively on SEO to drive traffic. On the other hand, websites that benefit from social media and paid advertising still stand to gain from improved SEO. WordPress has a number of SEO plugins (e.g. Yoast SEO and All In One SEO) that provide valuable SEO information about posts, pages, and overall site configuration. These insights tend to take the form of “tips,” “suggestions,” or “guideposts” rather than one-to-one automations. The webmaster, ultimately, is responsible for implementing all SEO changes.
This article is far from exhaustive, but it can be a good starting point for people who want to SEO-optimize their WordPress sites. Many SEO best practices can be implemented right away (1-7, 9) , while others require more background research and fine-tuning (8, 10-12). As you will take away from this post, it is a lot easier to employ SEO best practices from the jump than to go back in the future and make revisions. In many cases, it will make sense to start doing it the optimal way “from here on out,” in order to save time and avoid creating an even bigger SEO mess. Keep in mind that SEO is a long game, and it may take several months or longer before you see results from any optimizations you make today.
Without further ado, here are my top 12 SEO best practices, in no particular order. They are catered to WordPress sites, but most of them apply to all websites.
1. Create Keyword-Rich Titles
Titles give users and search engines valuable information about the contents of a post or page. When crafting a title, it is helpful to think about what users are likely to be searching for. If you want to employ a scientific approach, there are a number of tools you can use to research popular keywords and phrases (e.g. Soovle keyword search). It also helps to know your market or target audience, in general, and have an understanding of the kinds of topics and keywords that interest them.
For example, “You Won’t Believe What I Just Saw!” is a much less SEO-effective title than “Rare Video Of Poisonous Snake Attack!” The former is general and undescriptive, whereas the latter is specific and likely to connect with readers searching for that particular content. A lot of click-baity titles, in fact, are really bad when viewed through an SEO lens.

Another example is the title of this article, “SEO Checklist: 12 SEO Best Practices For WordPress Sites,” which is much more keyword-friendly and to-the-point than “12 WordPress Tips Taken From My Experience/Research.” Be specific, be direct, and use keywords and phrases that users are likely to enter into search engines.
2. Create Keyword-Rich Permalinks (URLs)
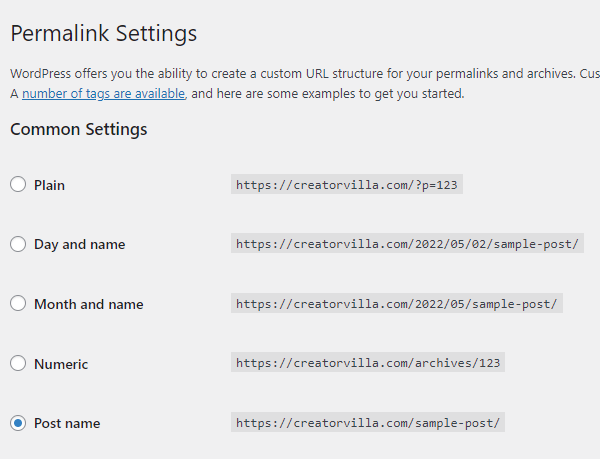
Every page has a unique URL that prompts the loading of its contents when a user enters it into a web browser. In WordPress, you can set the default URL format under Settings –> General –> Permalinks. The options are “Plain,” “Day and name,” “Month and name,” “Numeric,” and “Post name.” “Post name” (the “out-of-the-box” setting) is generally the most advisable (unless you have a reason to include the date). Permalinks with the “Post name” setting enabled are derived from the post title, which should already be keyword-friendly. The “Plain” setting, on the other hand, has no descriptive words and is pretty much a disaster for SEO.
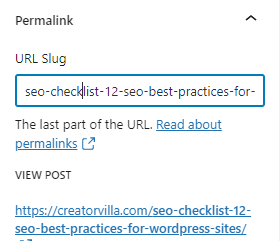
Even with the “Post name” setting fixed, you will still want to tweak the permalink generated for each individual post (before, not after publishing!). For example, if a post title is particularly long, you can omit words to make it shorter or remove prepositions and particles like “the” “for,” “to,” etc., in cases where they aren’t particularly relevant for SEO. Once you’ve published your article, you almost never want to modify the permalink afterwards, because doing so can lead to 401 errors (especially if you don’t have redirection set up), break backlinks, and negatively affect hard-earned page rank.
Warning: You should make changes to the permalink structure cautiously, with the long game in mind, and always ensure that proper redirection is set up to minimize the effect of broken links and SEO loss. In three years, I changed my WordPress permalink structure one time from “Day and name” to “Post name,” set up redirects, and had to wait several months for search engines to get up to speed. Once Google updated my permalinks in the search results (it happened progressively, not all at once), I lost page rank on a number of high-performing URLs, which took anywhere from several days to a few weeks to regain.
Bottom line: do your due diligence in advance, as unexpected changes can take place whenever you change the permalink structure, and it takes time for search engines to index new URLs. My advice is that if you don’t have a compelling reason to change the permalink structure, then don’t.
3. Organize Content By Paragraph Headers
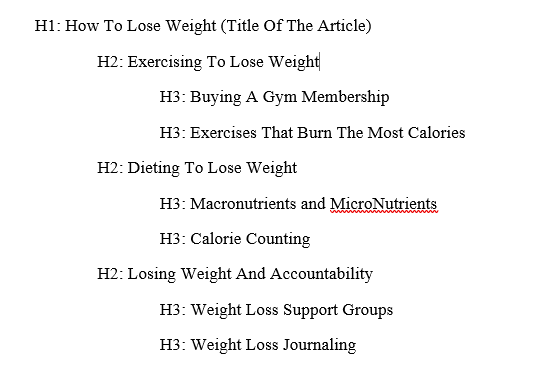
Search engines use paragraph headers to understand and categorize content. As a result, paragraph headers can be an opportunity for SEO. The title of a post is the default H1 header. However, you can add H2 headers (and H3, H4 sub-headers, etc.) in the body of the article as needed. The idea is to organize content in a logical fashion. For example, you would use an H3 header if the content for that section logically fit under an H2 header rather than the title of the article more generally.
Paragraph headers also facilitate the reading experience, and so it is advisable to include them for that reason, as well. Paragraph headers are something I neglected when I first started blogging. However, on all my new articles, I typically include at least one or a few H2 headers, depending on how long the article is, and occasionally some H3 headers, as well.
4. Consider Image Count And Post Length When Making Publications
It is common knowledge in the world of SEO that pages with images and text generally rank much better than pages consisting solely of text. Search engines favor pages with multi-media, in large part because users prefer reading them. Images make pages more lively and often contain valuable information in visual format. If you want a page to rank well, then consider including at least one image in the body of your post, and preferably multiple images, relevant to the content.
In addition, really short articles naturally don’t perform well in search engines. A post with 100 words, for example, is unlikely to rank against a post with 1,000 or 2,000 words. According to one study, the best word count for SEO was 1,447. There is no hard-and-fast rule when it comes to word count, and I have had shorter posts rank highly (500-750 word range), and much longer ones not do so well. However, search engines want to feature content-rich publications that add value to readers, not something that an author half-assed in a short period of time. Word count is one of many metrics search engines use to assess value.
5. Optimize Image File Sizes
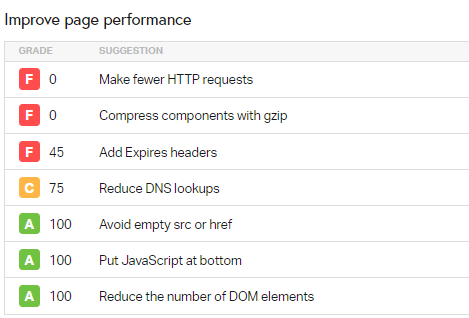
Images are often the item on a webpage that take the longest time to load, due to their large file sizes. When images are not optimized, they can negatively impact page performance. Page performance, in turn, impacts bounce rate (i.e. how many people click away from your site after viewing only one page). Page performance is also a factor of conversions (i.e., how many visitor undertake a desired action, like purchasing a product.) Better page performance = greater user retention and engagement, and vice-versa.
Page performance is also something that search engines like Google factor into their rankings. Google ranks for 3 “Core Web Vitals” — performance (how long it takes for content to appear); responsiveness (how fast does the page react to user input); and visual stability (to what extent does stuff move around on-screen while loading). Images with large file sizes can slow down all of the above, downgrading the user experience and reducing SEO score.
I use the free TinyPNG image compressor before uploading any images to my site. The effect of TinyPNG on image quality is said to be invisible, and I personally have not been able to tell the difference. There are also plugins that optimize images automatically after uploading to WordPress (or images you have previously uploaded). They either function similarly to TinyPNG or convert images to Web P, which is even more compact and web-friendly than .PNG or .JPG. Recently, I started using this function with the premium version of WP Fastest Cache, which further shrinks and optimizes my already-compressed images. EWWW Image Optimizer is widely considered the best free version with premium plans for bigger sites and further speed gains.
I didn’t understand the importance of image file size optimization early on, but now it is a part of my “pre-publish routine.” By resizing images, using TinyPNG, and utilizing a plugin that creates a Web P copy, I can typically get them to be less than 50 kb a piece, depending on how large/complex the original images are.
6. Create Keyword-Rich Alt Tags And Image File Names
Image alt tags, consisting of alt text, are designed to increase accessibility. Machines read the alt text to visually impaired people so they can make sense of entire webpages. The alt text also appears when web browser are unable to load images due to server/compatibility issues. Alt tags are meant to be descriptive, and search engines factor them into their algorithms. Leaving the alt text field blank can decrease accessibility and is a missed opportunity from an SEO vantage point.
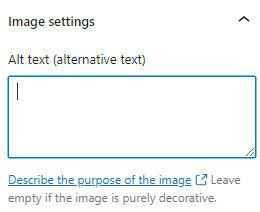
Image file names are similarly important for SEO purposes and are also intended to be descriptive. Naming an image something randomized (e.g. “1342353img”) provides no valuable information to search engines. On the other hand, properly labeled images can increase the SEO score of pages, and help those images rank independently on image search engines (e.g. Google Images). Words in image file names should be separated by hyphens, and you can leave out fillers. (E.g. “seo-checklist-12-best-practices-wordpress-sites.jpg”). Again, you can’t go back and change the image file name later without creating SEO complications, so make sure you get it right the first time.
7. Create Keyword-Rich Anchor Text When Linking To Content
Linking to quality content on topics relevant to a post gives search engines greater information about that post and can increase that post’s SEO score. When including links, both internal and external, you want to make sure the anchor text is informative. When I first started blogging, I frequently used “here” as my anchor text, as in “Click here.” I later discovered that this is inadvisable, because–while it may be seamless from the reader’s standpoint–it supplies no useful information to search engines about the link contents.
Now, for example, if I’m linking to a page entitled “Top 10 List of Universities,” I may include “Top 10 Universities” as the anchor text, or some other keyword or phrase relevant to my post. You can weave the anchor text into the article, or include it in parenthesis at the end of the sentence, as in the following: “One study demonstrated a parallel effect in rats after consuming sugar. (Study on sugar consumption in rats.)”
Be careful not to spam. I’ve read cases where sites were assessed a penalty for including numerous links whose anchor texts exactly matched the title of the article, in an effort to rank higher for that specific search parameter. Sites that gain a reputation for spam or other shady SEO practices can be assessed penalties. Search engines employ both algorithms and humans to make this determination.
8. Install A Cache Plugin
This one might as well be #1, because, when done properly, caching can drastically improve site performance. With a cache plugin enabled, pages get loaded from a pre-loaded version saved on the server, which can greatly reduce both server load and page loading time. Cache plugins also do things like minify HTML, CSS, and JavaScript (remove unnecessary code and markup), Combine CSS Files and Combine JavaScript Files (streamlining), Gzip (compression), browser cache (for lightning quick speed when a user reloads a page), and eliminate render blocking JavaScript, which similarly increases page speed. I currently use WP Fastest Cache, which increases my page speed by as much as ~70% for some locations (2+ seconds to 600 milliseconds on the East Coast of the US, according to tools.pingdom.com)
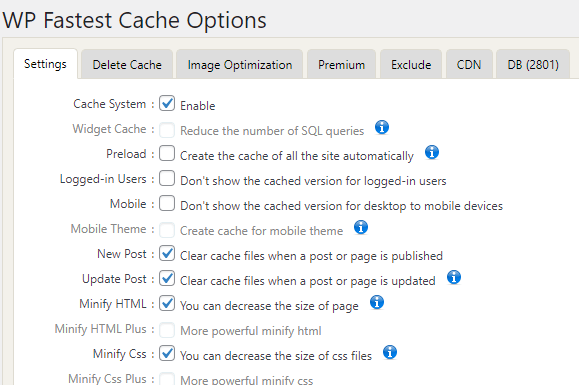
WP Fastest Cache is one of the best free caching plugins, and the configuration is simple and intuitive. I utilize the free version of WP Fastest Cache on one of my blogs and the premium version on another. (In my experience, its worth the upgrade for a one-time fee of ~$50, if you want some extra speed gains.) WP Rocket, W3 Total Cache, etc. all have great reviews, as well, and are used by large numbers of people.
In sum, speed is beneficial for SEO, lowers bounce rate, and increases conversions, and one of the most effective ways to increase speed is via a caching plugin.
9. Submit Sitemaps To Google, Bing, And Other Search Engines
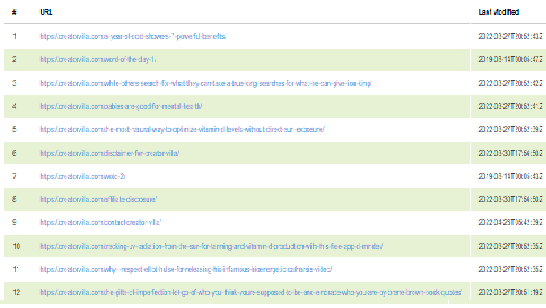
A sitemap (e.g. .xml) gives search engines information about the structure and content of your site, including text, images, and videos. According to my research, submitting a sitemap can increase the speed with which search engines index your pages and ensure they don’t miss anything important. Submitting a sitemap is not an absolute requirement (search engines will still index your site), but it is highly recommended. I used the Jetpack plugin to generate a sitemap. (Jetpack–> Settings–> Traffic–> Generate XML sitemaps.) Other plugins, like Yoast SEO and All In One Seo, also provide this service for free.
Once your sitemap is generated, you can submit it to Google in your Google Search Console. If you don’t already have a Google Search Console account, know that it doesn’t take long to set up and can provide a wealth of valuable SEO data. Google Search Console will tell you your site’s performance on Core Web Vitals and the assessed page quality of various URLs for both desktop and mobile versions of your site. If there are issues, it often recommends steps you can take to address them. Google Search Console is really a must as an in-house tool that Google uses to evaluate pages and websites and communicate with webmasters. Similarly, you can submit a sitemap to Bing using Bing Webmaster Tools.
Google at 87% commands the lion’s share of the search engine market share for the US, whereas Bing comes in second place at around 6%; Yahoo at 3%; and DuckDuckGo at 2%. That is according to April, 2022 data from Statcounter. Research the most popular search engines for your market or target audience, and consider submitting a sitemap where it is acceptable to do so.
10. Disable Plugins And Plugin Features That You Aren’t Using
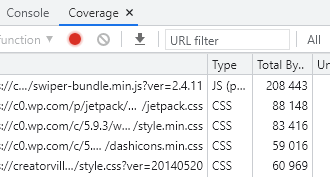
Plugins, for all their merits, are one of the biggest culprits when it comes to slowing down sites. To be sure, not all plugins are created equal, and some plugins, in particular, have a reputation for being “heavy.” You can Google around to see what the word on the street is as it relates to a particular plugin, or you can perform your own speed tests using tools readily available online. For example, by right clicking –> “inspect” with Google Chrome, the Chrome Dev Tools panel will appear. Chrome Dev Tools can tell you what resources are the heaviest (e.g. click “coverage” at the bottom, as pictured below, and you will see the size of specific JavaScript/CSS items, accompanied by the name of those items, which you can use to figure out which plugin is responsible. If “coverage” does not already appear, click the three dots –> More tools –> coverage.) For more on this item, I recommend checking out avoiding JavaScript heavy plugins in WordPress.
Once you’ve deactivated and deleted unneeded plugins, you can look to lighten the server load by disabling specific plugin features that you are not using. For example, I have the Jetpack plugin installed, but many Jetpack features disabled. Disabling unneeded front-end or back-end features can decrease server load and increase page speed.
Bonus tip: If you want a free plugin that decreases server load, check out Heartbeat Control by WP Rocket. Heartbeat, which is built into WordPress, enables live AJAX-powered communication between web browsers and your server, on both the back end (WordPress panel) and front-end (website visitors). Heartbeat, for example, provides dashboard notifications about plugins, user activity, etc., and periodically auto-saves posts you are working on. Many webmakers find some, or all, of this functionality unnecessary. With Heartbeat Control, you can reduce the frequency of pulses or disable Heartbeat outright.
11. Assess The Speed Of Your Theme
As is the case with plugins, certain themes have a reputation for being “light” or “heavy.” Heavier themes with complex functionality or sub-optimally written code can slow down your site, whereas the opposite is true of lighter ones. It is always preferable to do your own testing before making any drastic changes. Keep in mind that you can compare the speed of your site with different themes activated by using tools such as tools.pingdom.com, dotcom-tools.com, gtmetrix.com, pagespeed.web.dev, and thinkwithgoogle.com In fact, I have used all of these tools extensively to test the effect on speed of plugins/caching/custom CSS/embeds, etc. The beautiful thing about them is that they tell you exactly what is slowing down your site, and often suggest steps you can take to correct the problem.
Of course, speed isn’t the only thing to consider when selecting a theme. A simple, boring theme may be the fastest, but that doesn’t mean you should use it. A theme’s effect on speed should be weighed against user experience and the overall appeal of the site.
12. Use a Content Delivery Network (CDN)
A CDN is a network of servers that loads content according to a user’s location. Without a CDN, content always gets loaded from a single server location corresponding to your web host, regardless of where a user is located. For example, if my server is located in New York City, my site may load faster on the East Coast of the US, Canada, etc., while suffering speed losses the further west and east you go. On the other hand, with a CDN enabled, my site may load from a server in Berlin for a user in Germany, or the closest European location present in the CDN. It takes time for data to travel, and so CDNs have the potential to dramatically increase page speed.
I am familiar with Cloudlfare’s free CDN service that many small websites take advantage of. However, I would consider registering for a premium plan with Cloudflare, Stackpath, Bunny CDN, etc. if you really want to get the most of a CDN without sacrificing gains from caching. CDNs on a premium plan generally do caching a lot better than free alternatives in addition to increasing limits on data and volume. Caching plugins like WP Fastest Cache, W3 Total Cache, and WP Rocket are “compatible” with many CDNs (you can enable CDNs in the caching plugin panels). However, in my experience with Cloudflare’s free CDN, much of the functionality and speed improvement generated by WP Fastest Cache did not translate.
After I enabled the free version of Cloudflare, my page speed actually decreased. As I understand, this is because the free version of Cloudflare did not support many of the advanced caching features of WP Fastest Cache. My main server is also a Virtual Private Server (VPS), which is already much faster than the majority of competition. If I wanted to get the full benefits of a CDN, I would need to purchase a premium plan with fast servers that also supported advanced caching. In that case, I would have the best of both worlds (caching and CDNs) and my site would load faster around the world.
